
The Tolix chair, designed by Xavier Pauchard, is an icon of industrial design that, despite being more than 80 years old, is still current, since it is a versatile piece of furniture that gives an industrial touch to any interior, but that time fits perfectly in a more classic, rustic, vintage or even contemporary environment.

He realizado para el calendario de adviento que organiza todos los años Matxalen, una plantilla para podáis recrear esta silla a tamaño 1:12 en papel grueso. También lo he intentado con metal, pero al ser más fino que el papel, las medidas no encajan.
Vamos a necesitar:
For the advent calendar that Matxalen organizes every year, I have made a template so you can recreate this chair at a one-inch size on thick paper. I also tried it with a sheet of metal, but since it is thinner than paper, the measurements don't add up.
We are going to need:
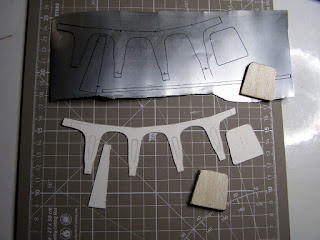

Os imprimís la hoja adjunta y calcáis sobre el papel grueso cada una de las partes de la silla (las patas, la base 2, la base 3 y el respaldo) y sobre la base de madera, la base 1.
Lo cortáis todo con cuidado.
Print the template and trace on the thick paper each of the parts of the chair (the legs, base 2, base 3, and the backrest) and on the wooden base 1. Cut everything carefully.
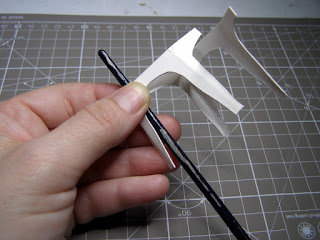
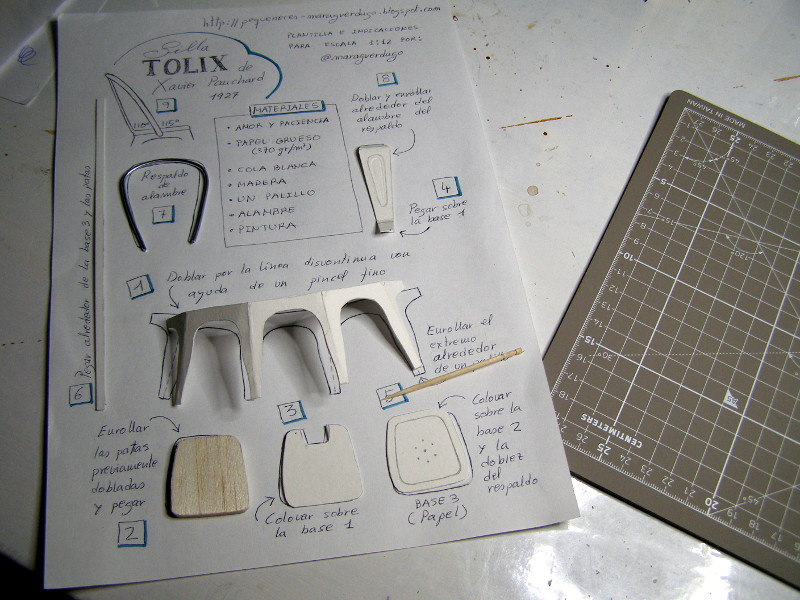
1º- Con ayuda de un pincel o una regla, dobláis las patas por la línea discontinua.

9º- Pegáis los dos extremos del alambre a ambos lados de la silla formando un ángulo aproximado de unos 115 °.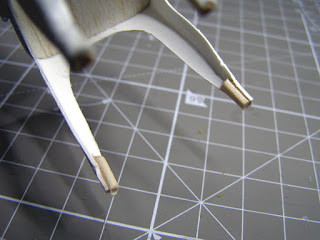
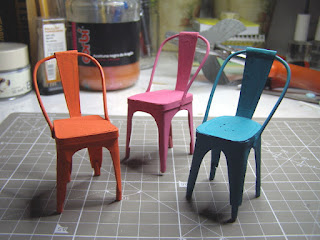
Y por último pintáis del color que queráis. Si sois mañosos, podéis imitar con pintura marrón y blanca, el relieve que esta silla tiene en patas y respaldo, pero no es necesario.
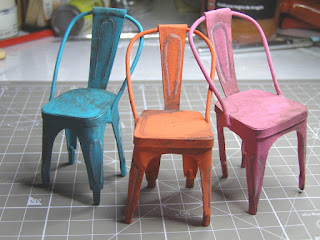
En las imágenes veis las diferentes versiones que he hecho hasta llegar a la que creo que está mejor conseguida que es la rosa.
And finally, paint it in the color you want. If you are crafty, you can imitate with brown and white paint, the relief that this chair has on the legs and back, but it is not necessary.


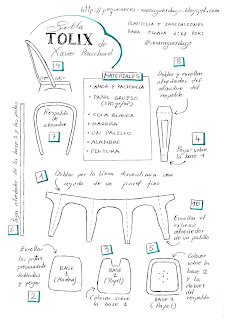
Esta es la plantilla de la silla Tolix a escala 1:12 en un DIN A4
Os agradezco muchísimo vuestra atención.
Espero que estéis bien, que os esforcéis por ser felices aunque sea sólo por llevar la contraria y que no dejéis de luchar por la libertad
Feliz Navidad.
Vamos a necesitar:
-Un poquito de paciencia, pues no es fácil del todo, y como en todas las cosas, mucho amor.- Papel grueso. Yo utilizo Canson para acuarela y témpera, de 370g/ m².- Pegamento o cola blanca- Madera (2-3 mm de gruesa)- Un palillo- Alambre- Pintura
For the advent calendar that Matxalen organizes every year, I have made a template so you can recreate this chair at a one-inch size on thick paper. I also tried it with a sheet of metal, but since it is thinner than paper, the measurements don't add up.
We are going to need:
-A little patience, because it is not easy at all, and as in all things, a lot of love is necessary.- Thick paper. I use Canson for watercolor and tempera, 370g/m².- Glue or white glue- Wood (2-3 mm thick)- a toothpick- Wire- Paint

Lo cortáis todo con cuidado.
Print the template and trace on the thick paper each of the parts of the chair (the legs, base 2, base 3, and the backrest) and on the wooden base 1. Cut everything carefully.

1º- With the help of a brush or a ruler, bend the legs along the dashed line.


2º- Le dais cola a la base de madera 1, y pegáis alrededor las patas previamente dobladas. Vamos a dejar por la parte de atrás el empalme, para que se vea lo menos posible.


2º- Apply glue to the wooden base 1, and glue the previously bent legs around it. We are going to leave the splice on the back, to hide the union.
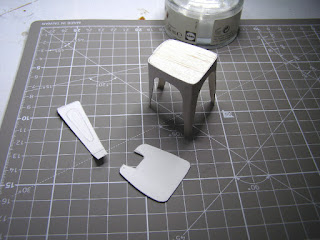
3º- Colocáis la base de papel 2 cuya función es simplemente nivelar el asiento.

3º-Place the paper base 2 whose function is simply to level the seat.

4º- En el hueco que ha dejado la base 2, pegáis la base del respaldo.

4º- In the empty space left by base 2, paste the base of the backrest.

5º- Con una chincheta, le hacéis los agujeros a la base 3, y la colocáis sobre la base 2 y la doblez del respaldo.
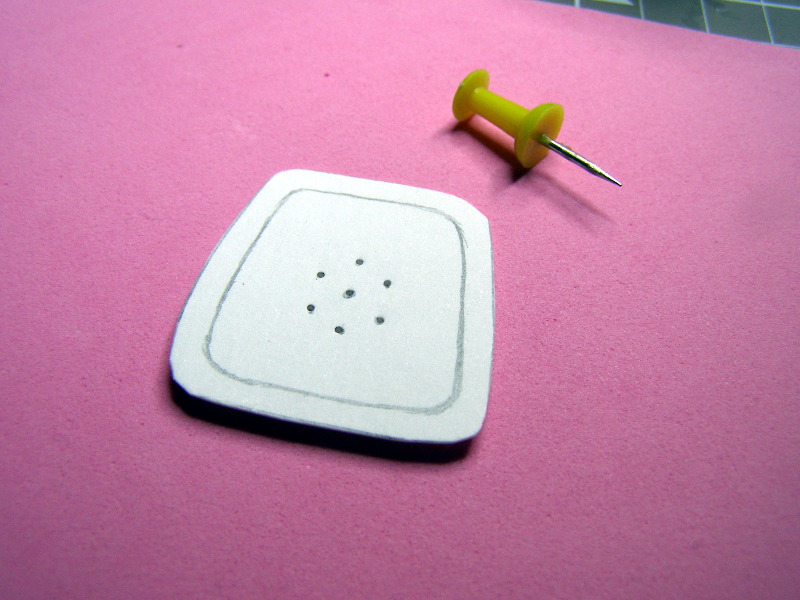
5º- With a thumbtack, make the holes in base 3 and place it on base 2 and the fold of the backrest.

6º- Cortáis una tira de papel (no necesariamente tan grueso como el que hemos usado) y la pegáis alrededor de las patas, muy pegado a la base 3.
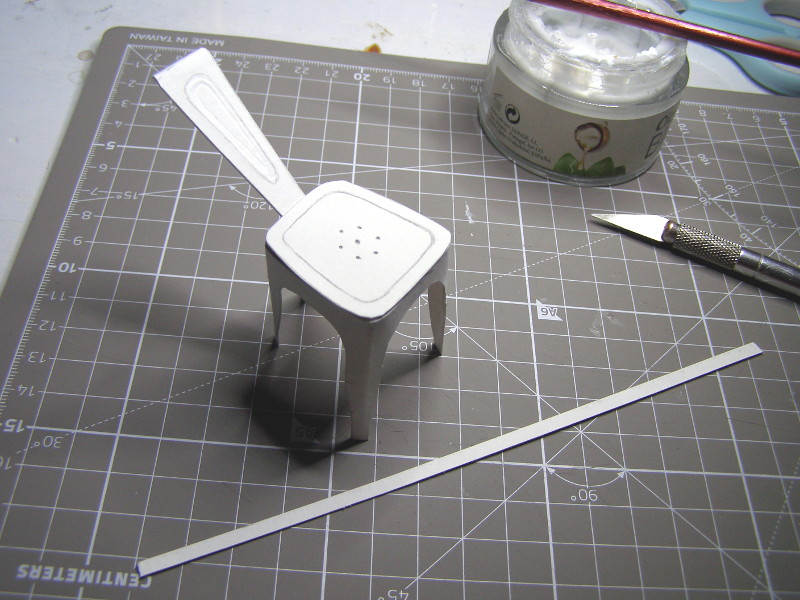
6º- Cut a strip of paper (not necessarily as thick as the one we have used) and paste it around the legs, very close to the base 3.
7º- Cortáis un trozo de alambre del tamaño y forma que os indico en el dibujo (yo he usado galvanizado del nº 12, pero si lo queréis más ligero, el alambre de aluminio es recomendable)

7º- Cut a piece of wire of the size and shape that I indicate in the drawing (I have used galvanized wire number 12, but if you want it lighter, aluminum wire is recommended)
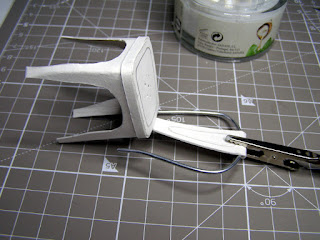
8º- Enrolláis la pestaña del respaldo alrededor de el alambre y le ponéis una pinza para que al pegar el alambre no se suelte.
8º- Enrolláis la pestaña del respaldo alrededor de el alambre y le ponéis una pinza para que al pegar el alambre no se suelte.
8º- Wrap the backrest tab around the wire and put a clothes pile on it so that when you stick the wire it does not come loose.

9º- Pegáis los dos extremos del alambre a ambos lados de la silla formando un ángulo aproximado de unos 115 °.
9º- Glue the two ends of the wire to both sides of the chair forming an approximate angle of about 115 °.

10º- Para evitar que las patas sedoblen con el uso, corta cuatro trozos de un palillo de 1 cm aproximadamente, y enrolla la parte final de cada pata alrededor.
10º- To prevent the legs from bending with use, cut four pieces of a toothpick of approximately 1 cm, and wrap the end of each leg around.


En las imágenes veis las diferentes versiones que he hecho hasta llegar a la que creo que está mejor conseguida que es la rosa.
You can see the different versions that I have made until I reach the one that I think is the best achieved, which is the pink one.


La he utilizado para recrear una escena vintage.
I have used it to recreate a vintage scene.
This is the one inch scale Tolix chair pattern in a DIN A4

Os agradezco muchísimo vuestra atención.
Espero que estéis bien, que os esforcéis por ser felices aunque sea sólo por llevar la contraria y que no dejéis de luchar por la libertad
Feliz Navidad.
Thank you very much for your attention.
I hope you are well, that you strive to be happy even if it's just to be contrary and that you do not stop fighting for freedom.
Merry Christmas.

Gracias Mara, me encanta este tipo de sillas, a tí desde luego te han quedado estupendas. Habrá que intentarlo.
ResponderEliminarGracias por participar un año mas en el calendario.
Un beso y Feliz Navidad
Gracias por el tutorial. Queda muy bien.
ResponderEliminarThank you so very much for this tutorial - I always love your minis and always glad to see when you post! This chair will look great in many miniature projects, again Thank you from Michelle in Tennessee. Happy Christmas!
ResponderEliminarme encanta, no sé cuando pero seguro la hago, muchas gracias por el tuto y feliz navidad
ResponderEliminarMuchas gracias por el tutorial, la silla queda preciosa!
ResponderEliminarFelices Fiestas Mara!
Besos.
Gracias por tan magnífico tutorial, está genial!
ResponderEliminarEs cierto que estas sillas encajan en casi todos los estilos. Te han quedado muy bien. Gracias por el tutorial!
ResponderEliminarMil gracias, soy Elsa Campuzano desde la ciudad de México.
ResponderEliminarTe han quedado geniales y el tutorial fantástico, muchas gracias y Feliz Navidad
ResponderEliminarThank you for the tutorial. The chair looks great.
ResponderEliminarHugs and Merry Christmas!
Drora
What a lovely tutorial, thank you very much for sharing it with us.
ResponderEliminarI wish you happy holidays!
Huibrecht
Gracias Mara, me encantan tus pequeñeces y Feliz Año Nuevo
ResponderEliminarMe encanta esta silla...el tutorial fenomenal. Ya he hecho dos...que han salido bastante bien. Muchas gracias y Felices Fiestas !!!
ResponderEliminarFeliz Ano Novo, querida Mara! Agradeço o tutorial. Você tão generosa sempre. Forte abraço.
ResponderEliminar