This blog is dedicated to the creation of 1:12 miniatures. Here you will find tutorials, techniques, links to great miniaturists, interior designers and artists. But above all, you will find a lot of enthusiasm and eager to help. Thanks for your attention, your coments and your friendship.

English is not my mother tongue, so, there will be many mistakes. I apologize for that. Anyway, On the right side of the page, you have the google translator, and of course, I am at your disposal for any cuestion.

Este blog está dedicado a la creación de miniaturas 1:12. En él descubriréis tutoriales, técnicas, enlaces a grandes miniaturistas, decoradores y artistas. Pero sobre todo,encontraréis mucha ilusión en cada proyecto y ganas de ayudar.

Muchas gracias por vuestra atención, vuestros comentarios y vuestra amistad.


sábado, 15 de diciembre de 2018

Calendario de Adviento 2018. Mueble de cocina- 2018 Advent Calendar. Kitchen furnitures

Os recuerdo que estoy participando en el Calendario de Adviento programado por Matxalen y cuyos tutoriales podéis visitar aquí.
Hoy vamos a hacer un mueble de cocina sobre el que colocar la cocina eléctrica que hicimos en la entrada anterior.

I remind you that I am participating in the Advent Calendar programmed by Matxalen and whose tutorials you can visit here.
Today we are going to make a kitchen cabinet to place the electric kitchen stove that we made in the previous entrance.


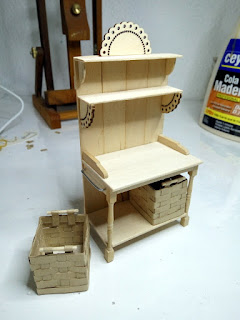
He utilizado maderas de 2 y 3 mm de grosor, fundamentalmente palos de polo anchos y un par de adornos de scrapbooking y dos balaustres de madera.

I have used 2 and 3 mm thick woods, mainly polo sticks and a couple of scrapbooking ornaments and two wooden balusters.

Primero hice la parte de atrás con 4 listones verticales y dos atravesados por detrás.
Después corté el resto de las piezas y procedí a montar primero la mesa y después las estanterías.

First I made the back with 4 vertical slats and two crossed behind.
Then I cut the rest of the pieces and proceeded to assemble the table first and then the shelves.


Fijaros que el tablón de la mesa inferior, tiene en dos de las esquinas unas muescas para que encajen los balaustres.

Notice that the board on the lower side has two notches in two of the corners to fit the balusters.

Pinté el mueble de blanco y dejé el sobre de color roble claro. 
Las cestas tienen una base de madera y están hechas de papel craft. Con unos palillos hice las asas y las pinté de blanco.

I painted the piece of furniture in white and left the board table in light oak.
The baskets have a wooden base and are made of craft paper. With some chopsticks I made the handles and painted them white.

Al mueble le añadí en uno de los lados, un alambre para poder colgar los trapos.

I added on one side a wire to hang the rags.


Y esto es todo. Es un mueble muy sencillo y fácil de hacer. 
Os recuerdo que continúo haciendo miniaturas y que podéis seguir los procesos en directo desde mi cuenta de Instagram.
Os deseo a todos unas felices Navidades.

And that's all. It is a very simple and easy to make piece of furniture. I remind you that I am still making miniatures and you can see the processes live and direct in my Instagram account.
I wish you all a Merry Christmas.


sábado, 1 de diciembre de 2018

Calendario de Adviento 2018. Cocina eléctrica- 2018 Advent Calendar. Electric cooking stove

Ya sabéis que todos los años, Maxalen organiza un Calendario de Adviento de miniaturas. Pues bien, este año me toca a mí inaugurarlo, lo cual es un honor y no puedo más que agradecérselo.

You know that Matxalen organizes an Advent Calendar of Miniatures every year. I have the pleasure to start this year so I must say thak you for this opportunity.

Este tutorial es extremadamente sencillo, y os puede valer tanto para hacer maletas como cocinas eléctricas, que es lo que yo he hecho.
Necesitaremos:
- Papel grueso especial para acuarela y témpera. (Yo utilizo Canson de 370g/m². Es muy denso, no se deforma al humedecerse y no tiene textura)
- Alambre de estaño para soldadura o en su defecto un alambre de aluminio, que es muy maleable.
- Unas cuentas de bisutería
- Unas tiras de metal (a mí me gusta usar los precintos metálicos de las botellas de agua Solán de Cabras)
- Pinturas acrílicas

This tutorial is extremely simple, and it can be useful to make suitcases or electric cooking stoves like I did.
We will need:
- Thick paper for watercolours and tempera. (I like Canson de 370g/m². It is very dense, has no texture and it does not wrinkle when is wet)
- Tin wire for welding or aluminium wire
- Jewelry beads
- A thin strip of metal (I Like to use the metallic seal of the water bottles)
- Acrilic paintings


Cortamos dos rectángulos con las esquinas redondeadas, siendo uno de ellos 1 mm más pequeño que el otro por cada lado. (5 cm X 3 cm y 4,9 cm X 2,9 cm)

Cut two rectangles with rounded corners. Make one of them a 1 mm smaller for each side. (5 cm X 3 cm y 4,9 cm X 2,9 cm)


Cortamos dos tiras del mismo papel, del grosor que queramos. En mi caso una tiene 7 mm de grosor y otra 5 mm.
Pegamos cada tira perpendicularmente al contorno de cada rectángulo, de modo que sobresalgan bastante por un lado y ligeramente por el otro.

Cut two paper strips. In my case, one of 7 mm width and the other 5 mm.Glue each strip to the edge of the rectangles forming a right angle.


Hacemos con un cúter, dos pequeñas incisiones alargadas, sobre las tiras del rectángulo pequeño, donde vayamos a poner las bisagras.

Cut two short incisions in one of the parts to place the hinges.


Para hacer las bisagras, aunque no son bisagras propiamente dichas pero funcionan igual, utilizo el precinto metálico del agua embotellada, ya que esta tira metálica tiene un repliegue, que va a hacer de tope y nos va a permitir abrir y cerrar la cocina, sin que se salga la tapa. Cortamos dos trocitos del ancho de las incisiones y con un alicate lo curvamos.

To make the hinges, I use the metallic seal of the water glass bottles. This has a rounded edge that acts as a stop for the cap will not slip off.
Cut two little pieces and bend them with a plier.


Introducimos las bisagras por las incisiones de la tapadera de la cocina y las pegamos a la parte inferior.

Insert the hinges through the incisions of the kitchen lid and glue them to the base of the cooking stove.


Pegamos dos cuentas de bisutería para hacer los interruptores.

Glue two jewelry beads to make the switches


Como quiero darle un aspecto esmaltado, antes de dar el barniz brillante, se le da una capa de gesso a toda la cocina y se deja secar.

As I want to get an emanel look, first I have to aply gesso and let it dry.


Se pinta del color que se quiera y se aplica barniz brillante. A mí me gusta usar Diamond glaze porque se seca muy deprisa.

Paint and apply shiny varnish. I like Diamond Glaze because it dries very quickly.


Para hacer las resistencias, he usado alambre de estaño que se utiliza para soldar, porque es muy maleable. He hecho dos espirales aplastadas de diferente tamaño y las he envejecido. (Esta parte no es necesaria)
Las he pegado a cada lado, y con un rotulador negro he manchado algunas zonas para simular que se ha saltado el esmalte.

I used tin welding wire to make the resistors, but aluminium wire is also possible since its malleability. I did two spirals and aged them.

Y esto es todo por ahora. Os recuerdo que tengo una cuenta de Instagram que tiene bastante movimiento, pues aunque veáis que el blog está algo parado, yo no dejo de hacer miniaturas, y allí, voy contando mis progresos en tiempo real.
Un abrazo a todos y gracias por pasaros por aquí.

And that is all for now. I remember you that I have a busy Instagram account. Although you can see the blog a bit inactive, I continue making miniatures, and you can see the processes in Instagram in real time.
Thank you for dropping by my blog. Huges.


Related Posts Plugin for WordPress, Blogger...